Pages

Tuesday, 26 March 2013

DIY: Flower Pens in a Vase

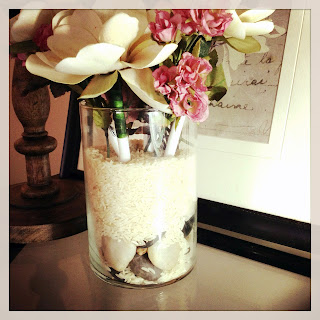
This is a really easy and beautiful way to have a few pens on your desk without look of a plain pen holder. Not only does it look great, it's cheap and takes less than an hour!


What you need:
  • Pens
  • Synthetic flowers. (I used large flowers for the pens and small flowers and garnland for fill)
  • Vase (I used a clear cylindrical vase from the dollar store)
  • Vase fill (I used stones and rice)
  • Floral Tape


Attatch the flower heads on to the pens using floral tape. I chose not to wrap the floral tape all the way down the entire lenth of the pen as it make the pen feel sticky to hold. I just wrapped the tape down a couple inches. This may take some fiddling around to get it tightly secured.


Fill the vase with rice, beans, craft sand...whatever you choose. Then you can arrange the pens and garnishing flowers however youd like. 


Choose colours to match your decor... use a more decorative vase if you wish... the world is your oyster!  If you make this project, post it in the comments below. I'd love to see what kinds of variations you come up with!


Sunday, 24 March 2013

Spray Painted Doily Canvas (Shey B Tutorial)

I made these doily canvases last summer and only just now put them up on my wall. I actually made 5 but the 2 you don't see here I used a bright blue spray paint which I ended up not liking.

Check out Shey B's Blog for the full tutorial!


Saturday, 23 March 2013

DIY Hanging Pendant Lamp!

Hello everybody! I made this lamp for my apartment over a year ago and am finally posting it for the world to see. The main reason I decided I wanted a pendant lamp for my living room was because one of the outlets in my living room is controlled by a switch at the entrance of my apartment. It is also in an awkward location where I did not want a floor lamp. 

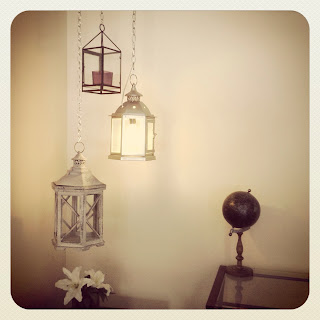
I love the idea of things being mismatched so I found 3 of these hanging candle holder lanterns. They're 3 different sizes and all different finishes. I also purchased a swag lamp kit shown in the picture below. The one I purchased is from home depot and can be found at the link below:


I also used S hooks and some screw in 0 hooks


Materials:

  • 3 hanging candle lanterns of different sizes
  • Swag lamp kit
  • Ceiling hooks (I already had O hooks and S hooks so I used those. But you could just use ceiling plant hooks and hook the chain directly onto those. You will need S hooks to attach the chain to the lanterns unless tyou choose another method)
  • Extra chain (if needed)

Tools:

  • Power drill
I started by measuring the length of chain needed for the wired pendant. You can't see it in the picture below, but the chain and wire are hung from the ceiling, then they are attatched again about 6 feet over at the ceiling against the wall where the outlet is, and then it drops straight down. 

It's been so long since I did this project I can't exactly remember but I think I ended up using the entire length of chain that came with the swag lamp kit for this. Before wiring the lamp I weaved the wire through the chain about every 4 links.

I then wired the socket inside the middle sized lantern. I just used to youtube video to learn how to wire a lamp. There are many out there. Here is a good descriptive tutorial:

I used an S hook to attach the lamp socket to the inside of the lantern and another S hook to attach the chain to the top of the lantern. Figuring out how to run the wire through and attach the socket to the inside of the lantern was the hardest part. It will be different depending on the lantern..some may be easier than the one I used. There's really no correct way..whatever works...works.

I used the 2 hooks that came with the kit to attach the wired chain to the ceiling in the 2 locations. I hung the wired lantern up first at the height I thought was best. It's at about eye level for me.

I used the power drill to drill holes in the ceiling before screwing in the hooks.

I then used the extra chain I purchased to hang the smallest and largest lantern. I hung the largest slightly below and the smallest slightly above the wired lamp. I used S hooks to attach the chain to the lanterns, and you can attach the chain directly to ceiling plant hooks.

Note: The 3 hooks for the lanterns are positioned on the ceiling in a triangle


And here is the final product!


Please let me know if you have any questions. I know the instructions aren't the greatest as I didn't take pictures of each step. 

Also note: I put a candle in the top lantern... it looked a little too plain being empty...and the colour of the candle is also the colour of my curtains on the other side of the room.

Friday, 22 March 2013

DIY Wall Mounted Headboard Completed!


Here it is, the final product!


Mounting the tiles to the wall was relatively easy. I decided to use this Duck brand mounting tape. It ran me about $5 for a 15' roll. I cut small pieces and used 5 for each tile (one piece in each corner and one in the center). 


First thing I did was measure the center of the bed and used a level to draw a vertical line to match the first tile up to. For each row I started at the center and worked my way out. 


And this is what it looks like completed without the pillows covering the bottom row.


Click here to view the first step with instructions!


Thursday, 21 March 2013

DIY Wall Mounted Headboard

I've been flirting with the idea of making my own wall mounted headboard for quite some time now. I had originally planned on making some type of patchwork upholstered headboard but my history of procrastination and indecisiveness is leading me to believe I won't likely be taking on that project anytime soon.

Strolling around the dollar store the other day I came across some craft paper that intrigued me. The prints were great...Paisley, Floral, Damask... I immediately thought "Headboard!"

I wasn't sure at first how I would accomplish the project... all I knew what I loved the prints on the paper and I needed to figure something out. I only bought about 6 packages at first just to take hope and lay out to see how all the prints would look together. I also wasn't sure what I would adhere them to before mounting on the wall.

I got home, layed all the tiles on the floor... and it looked great (to my taste). I did the measurments and decided I wanted it to be 6 tiles by 3 tiles. I went back to the store the next day and bought a few more packages. I ended up buying more than I needed as some packages had 2 tiles each but some packeges I only liked one of the prints. For $1/pkg I wasn't concerned. This is way I arranged them on the floor.


While I was at the store I came across these cork tiles. They're approximately 11.75" x 11.75". The craft paper squares are about 12" x 12" so I'd be able to adhere the craft paper to the tiles and cut the remaining off with my rotary blade. 


I used spray adheside to spray on the cork tiles and the back of the craft paper. I tried to line at least one side of the craft paper up flush with the cork so I'd only have to cut 2 or 3 sides.


Right now I have a pile of paper-covered cork tiles sitting on my coffee table waiting to be hung above my bed. Still deciding whether I'll use Command strips or some type of double-sided tape to mount them on my wall.

Click here to see the finished product!


Here's a recap of the supplies:

12"x12" Craft Paper (Quantity depends on desired size) - $1/pkg of 2
Cork Tiles (I used 18) - $2/pkg of 2 = $18
Spray Adhesive
Rotary Cutter
Command Strips/Double Sided Tape